


When it comes to science, there's nothing like a good experiment to demonstrate concepts! In this blog post, we salute this important field of study, and share our six favorite science-related activities that you can do with your child!
Science is a fascinating subject where kids of all ages can learn a lot — whether they're in a cyber charter school or a brick-and-mortar setting!
From exploring the world around them, to understanding the basics of physics, chemistry, and biology, science experiments can be a fun and educational way to teach children about the world they live in. In this blog post, we'll look at some of our favorite science experiments for kids.
The Lava Lamp Experiment
The lava lamp experiment is a classic one. It’s an easy experiment that kids can do at home with the help of an adult. To perform this experiment, you will need:- Clear glass jar or soda bottle;
- Vegetable oil;
- Water;
- Water-based food coloring;
- Alka-Seltzer tablets.
Fill the glass jar with about two-thirds of vegetable oil and one-third water. Next, add a few drops of food coloring to the jar. Lastly, break an Alka-Seltzer tablet into small pieces and drop them into the jar. As the tablet dissolves, it will release gas bubbles that will cause the colored water to rise and fall in the oil.
This experiment is a great way to teach kids about density, the properties of liquids, and chemical reactions.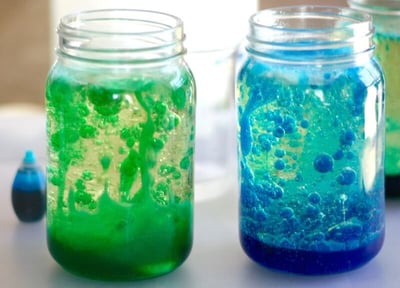
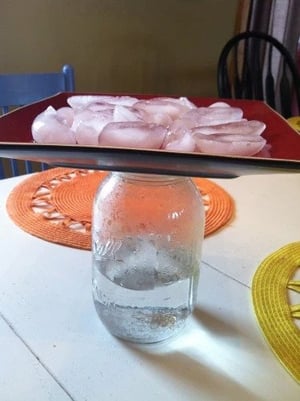
The Water Cycle Experiment
The water cycle is an important concept in science, and affects our lives every day. This experiment teaches students about how water evaporates and condenses in the atmosphere to form clouds.
To perform this experiment, you will need:
- Clear glass jar;
- Small plate;
- Some water;
- Ice cubes;
- Food coloring (optional)
Fill the glass jar with water and place the plate on top of it. Next, put some ice cubes on top of the plate. As the water in the jar evaporates, it will condense on the plate and form droplets of water that resemble clouds. Eventually, it will “rain” inside the jar!
This experiment is a fun and interactive way to teach kids about the water cycle and the different stages.
NOTE: Variations of this experiment include pouring hot water into the jar. The effect is the same, just sped up! Use caution when handling hot liquids.
The Mentos and Soda Experiment
The famous Mentos and soda experiment is a favorite among kids! It is a great way to teach them about chemical reactions and, although messy, will keep a child’s attention during your lesson.
You will need:
- Large bottle of soda
- Mentos candies
Move yourself outdoors or to an area where making a mess isn’t an issue! Next, open the bottle of soda and drop a few Mentos candies into it, and then stand back. The carbon dioxide in the soda will react with the Mentos, causing the soda to shoot out of the bottle in a fizzy explosion.
This experiment is a memorable way to teach kids about the properties of carbon dioxide and how chemical reactions work.

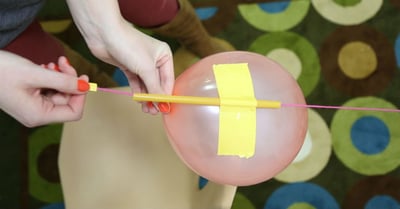
The Balloon Rocket Experiment
The balloon rocket experiment is an interactive way to teach kids about the properties of air, how it is used to create motion, and even some basic physics!
First, you'll need to grab:
- A long piece of string;
- A straw;
- Some tape;
- A balloon.
Tie one end of the string to a stationary object, such as a chair or a doorknob. Next, thread the straw onto the string and tape it in place. Blow up the balloon and tape it to the straw. When you release the balloon, it will shoot down the string like a rocket.
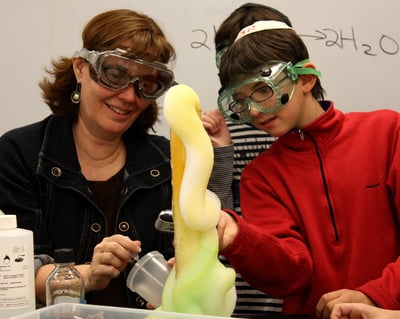
Elephant Toothpaste
While it’s unlikely that elephants regularly use toothpaste, this fun experiment demonstrates the reaction between hydrogen peroxide and yeast, and involves chemistry, biology, catalysts, surface tension, and reactions. And yes, it simulates foaming so big that an elephant could use it to brush its teeth!
NOTE: Do not let your children try to eat this “toothpaste.” It’s definitely not the same! Use caution with peroxide, as it can burn and irritate skin if there are open wounds.)
All you need to perform this experiment is:
- A plastic bottle;
- Hydrogen peroxide (can use 3%, but a 6% solution is stronger and will react more; just use caution);
- Dish soap;
- Food coloring;
- Dry yeast;
- Warm water;
- Safety glasses (NOTE: Purely a precaution, as hydrogen peroxide can irritate your eyes if you get it in them.)
Find a place to do your experiment, preferably on a tray or in a tub. In the bottle, mix 1/2 cup of hydrogen peroxide with a few drops of food coloring and a squirt of dish soap. In a separate container, mix 1 tablespoon of dry yeast with 2 tablespoons of warm water. Pour the yeast mixture into the bottle and watch as the mixture foams up and out of the bottle, resembling toothpaste coming out of an elephant's trunk.
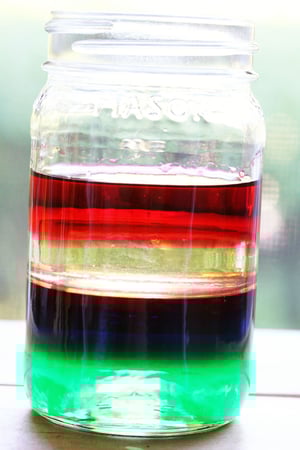
Rainbow Density Jar
Much like the lava lamp experiment, this experiment is a fun way to learn about density and how different liquids have different densities.
You will need:
- A tall, clear glass jar;
- Food coloring;
- Corn syrup;
- Dish soap;
- Vegetable oil;
- Rubbing alcohol;
- Water.
NOTE: Some recipes also call for pure maple syrup, olive oil, or honey. If you want, feel free to add these to the list!
To start, add corn syrup to the bottom of the jar, followed by a layer of dish soap. Then add vegetable oil, rubbing alcohol, and finally water. Add a few drops of food coloring to each layer (we recommend you stagger the colors), and watch as the colors separate and create a beautiful rainbow. The corn syrup is the densest, followed by the dish soap, oil, and alcohol, while water is the least dense.
These experiments are not only fun and entertaining but also educational. They teach children about science concepts such as chemical reactions, air pressure, motion, and more. Plus, they can be done using simple household items, making them easy and inexpensive to set up. Encourage your children to experiment and discover the world of science.
 About the Author: Sheik Meah is the director of marketing and communications at PA Virtual.
Photo credits to: Victoria_Watercolor on Pixabay; littlebinsforlittlehands.com; greenkidcrafts.com; Michael Murphy via Wikimedia Commons, blog.kaplanco.com, eigenadam via Wikimedia Commons, and birdandlittlebird.com.
Comments